1.Open the section ‘Virtual terminal’ to execute a payment.
- If there are several merchants which has been configured for payments via virtual terminal, the system provides a drop-down list to select the desired merchant. Selected merchant has to be confirmed by clicking "Next" button. If the merchant is running in test mode, his name contains the word "test" (in parentheses and without the quotes).
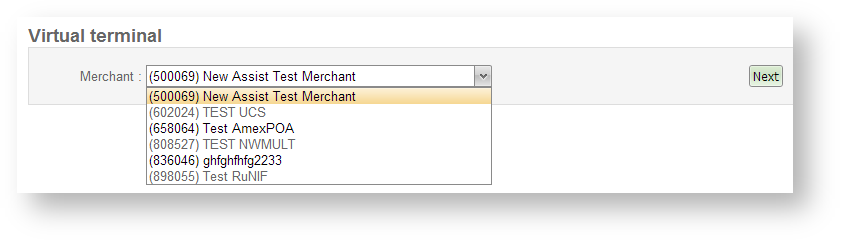
Merchants selecting window
- If there is only one merchant with is configured for payment via virtual terminal, the merchant selection is not proposed, and immediately moves to the payment screen.
2.The payment screen form includes one or more tabs, depending on the number of available payment methods for this merchant.
3.Next, go to the tab of necessary type of payment (active tab is highlighted in green). Required parameters are marked with asterisks.
The tab has following elements:
- the unique identifier of the merchant;
- the name of the company (if the merchant is running in test mode, his name contains the word "test", in parentheses and without the quotes);
- input fields of the order data;
- "Pay" button.
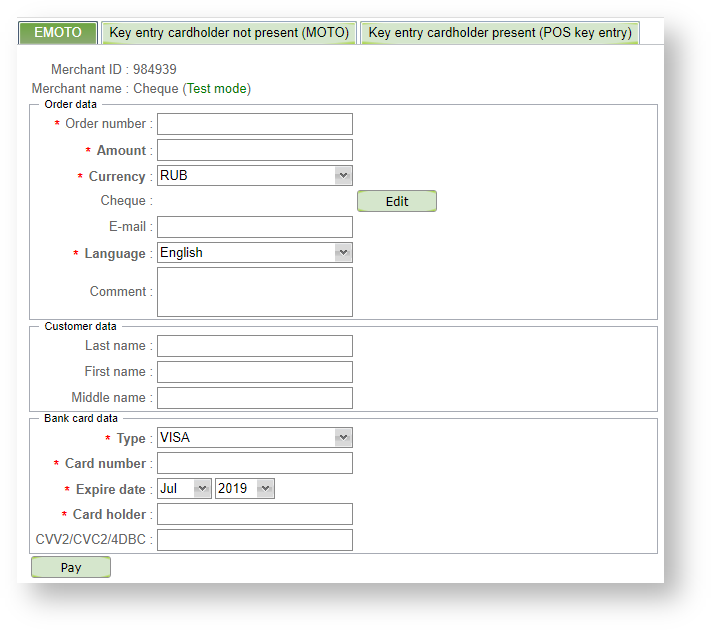
Order creation
4.Now you should fill the payment screen form. Confirm the entered data using the "Pay" button.
There is the section "Fiscal parameters" in the right part of the screen form. In this section are the payment parameters required for payments with fiscalization through the IPS Assist. If the section "Fiscal parameters" is not available, the merchant needs to contact the support service of the IPS Assist to obtain information about this service. In the "Order data" section there is also a field "Cheque" for displaying the order composition by items. Clicking the "Edit" button allows you to add the necessary cheque items during creation of an order. If the "Edit" button is inactive, then the merchant does not work with the cheque, to enable this function, contact the support service of the IPS Assist.

Payment authorization window
When the currency of the payment authorization is not the same as the original currency, then:
- fields «Authorization amount» and «Authorization currency» with the appropriate values will appear near the fields "Amount" and "Currency";
- all fields of screen form will become read-only;
- the "Confirm" button will appear (press it to confirm the payment).

Amount and currency confirmation window
When the currency of the payment authorization the same as the original currency the authorization result can be seen immediately.
5.The result of the authorization is shown on bottom of screen. The following information is displayed:
- confirmation code;
- message to the customer;
- message;
- recommendation;
- response code;
- date;
- order number;
- payment number.

Window with result of the authorization
6.To perform the next payment do the following steps:
- if you want to perform a payment for the same merchant and in the same mode of payment, you should click on the "New Payment", then all fields will be cleared and you can input the new payment data;
- if you want to perform a payment in other payment mode, you have to go to the appropriate tab;
- if you want to perform a payment to another merchant, then you have to click the "Back" and re-select the merchant.